Select Open to load an existing part, sheet, macro, special tool, tool inventory or machine file. Also import DXF, IGES, DWG or IGA files.
Open a Part or Sheet file Anywhere on the Computer
Filtering Sheets, Parts & Tools
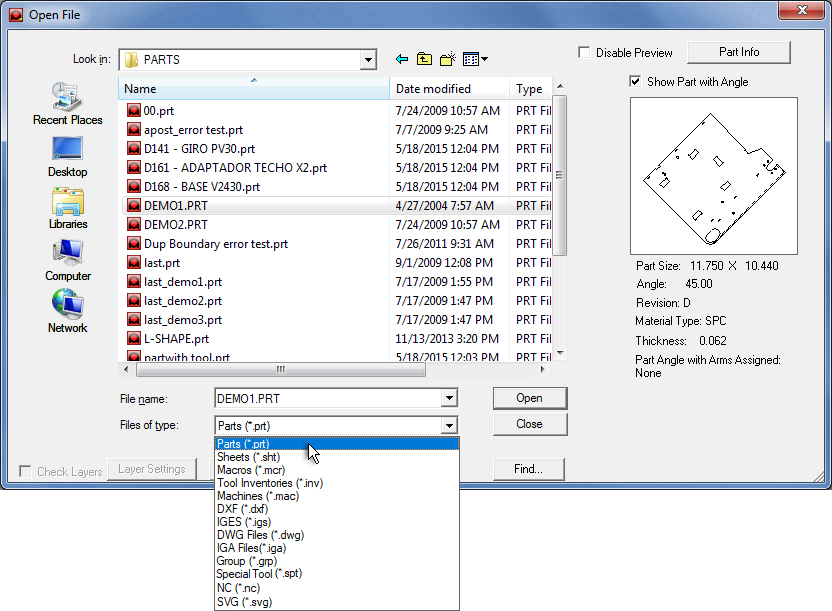
The Open File dialog box allows the user to navigate the hierarchical folder structure to display files according their types.
The Parts folder has been selected from the "Files of type" field
Available file types such as .prt, .mac and .svg appear in the drop-down field. In the above example, the Parts (*.prt) folder has been selected from the Files of type. From the list of available parts in the Parts folder, DEMO1.PRT has been chosen and displays in the thumbnail preview at the upper-right, along with Part Size, Angle (if the part was previously saved with an angle) and Revision. If a part has been edited, the user may enter a revision number or letter in the Part (CAD) Information window. Also, if the part was saved with a TK Part Remover arm, the angle of the arm will appear here.
Reverse
Driver File (for Amada NC files)
When the user opens an Amada NC file the
Reverse Driver
File will automatically engage and
reverse engineer the Amada NC file to create an editable part or sheet
in AP100US. This function is available only for Amada laser machines made
after 2007.
(Laser code used in older Amada machines is not compatible.)
Note: The .rev file that will be generated only covers Gcode; Mcode is not covered.
In the Open File window load the NC file that contains the part or sheet that will be opened in AP100US. In the Files of Type field select NC and open the NC file. Before it can be opened, the system will ask in the Output pane if the program is Metric. For an Amada file select N for no.
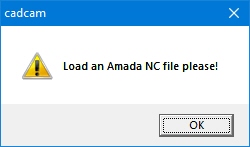
Non-Amada files are not compatible
When the part or sheet opens in the work area, it may be edited and saved normally. Keep in mind that the machine used in the .rev file will force the system to create an NC code file specifically for that machine type.
If necessary the user may open the Cutting.ini file in the C:\AP100US\Parm folder to disable the feature.
[Setting]
Skip Sheet Edge Cut=1
Auto Notch Cut Out=0
Reverse Driver File=AMADA LASER.rev
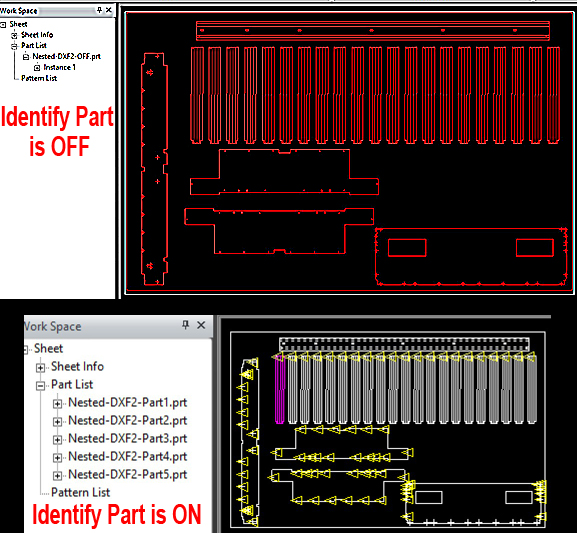
Nested or Multiple Part / DXF & NC files
When the DXF and NC Files are nested as multiple parts the behavior during importing will be dependant on the settings in the C:\AP100US\Parm\ Setting.ini file -
[LoadDxf]
BatchConvertVisible=0
IsAcorn=1
DxfPartHasECORevision=0
DxfPartHasRevDate=0
PreProcessDxf=1
CheckDxfIsSheet=1
IdentifySameParts=1
When Identify Parts is switched OFF the program sees this sheet as one part (Notice Instance 1), but in the below image Identify Parts is ON and the parts are seen as separate instances.
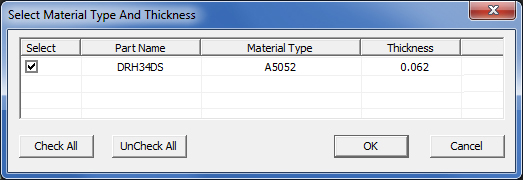
Material Type & Thickness Check
If the user attempts to open a part with a material type and/or thickness
that differs from the material in use on the current sheet, the Select Material Type and Thickness
dialog will automatically open. The user must then select the current
material type by checking ON the check box for the similar material
(forcing the part to use the currently loaded sheet material). If the
user does not check ON the material type, AP100US will not allow that
part to be added to the sheet.
Searching for Parts
The system always searches the default path (such as "C:AP100US\PARTS")
specified when the software was installed; however, this directory may
have been manually changed during installation. View the contents of other
directories using the Look in: folder list. Search for and load
other file types, such as Sheets, Tool Inventories, DXF or IGA Group and
NC files in the same manner.
NC files of parts and sheets may be opened in the AP100US Work area. If using this method to open files, then it will be necessary to load a *.rev file in the Machine Info window. See Machine Info > Using a Reverse Engineering driver.
Note: The system warns the user to save the current sheet when opening a new one.
Batch Open files
Files (.prt, .dxf and .dwg) can be batch opened by selecting + CTRL or SHIFT. In the Sheet View, selected parts are placed on the sheet according to settings in the Machine Settings>Sheet Layout Info window.
Note: If there isn't enough space on the sheet to load all parts, the system will stack them in the left lower corner of sheet.
Compare this to the Batch Part Loading option in the Part List.
When a part
has been selected the  button displays above the part
preview. Click to display editable part info.
button displays above the part
preview. Click to display editable part info.
See Part Information.
Likewise,
when a sheet has been selected the  button will become active. Click to display read-only material and CAM
info.
button will become active. Click to display read-only material and CAM
info.
See Sheet Information.
Note: When a sheet is selected the size, material type and thickness display under the thumbnail image.
Checking the Disable Preview checkbox will disable the preview window.
Place a check
in the  checkbox to allow the part to be shown at the
angle it was saved with. The value of the angle also displays. If the
Disable Preview checkbox is enabled, this option will not be available.
checkbox to allow the part to be shown at the
angle it was saved with. The value of the angle also displays. If the
Disable Preview checkbox is enabled, this option will not be available.
Other Part Info
Further information on the selected part is given:
Part Size - the Angle the part
was saved with,
Revision
- Entered in the Sheet
Wizard Revision column,
Material Type and Thickness
if these were saved with the part,
Part Angle with Arms Assigned -
This field will read "None" if no part remover arm was saved
with the part. However, if the part was saved with a part remover arm,
this field will show the angle of that part. If two or more copies of
the part were saved at different angles, each with a part remover arm,
the angles of each copy will display here. See Save
Arm Data to Part for more info on saving part remover arms with a
part.
Click Open to load the selected file (or just double-click the file). Other file types may also be browsed and selected at this point. Click Close to exit the Open File dialog box.
Open a Part or Sheet file Anywhere on the Computer
Users can also double-click a PRT or SHT file located anywhere in the computer (such as inside Windows Explorer or on the desktop) and have the AP100US system automatically launch with the specified PRT or SHT file already loaded into the work area.
Note: Double-clicking an invalid PRT or SHT file will launch a new AP100US program, and also inform the user that the invalid part can’t be loaded.
Filtering Sheets, Parts & Tools
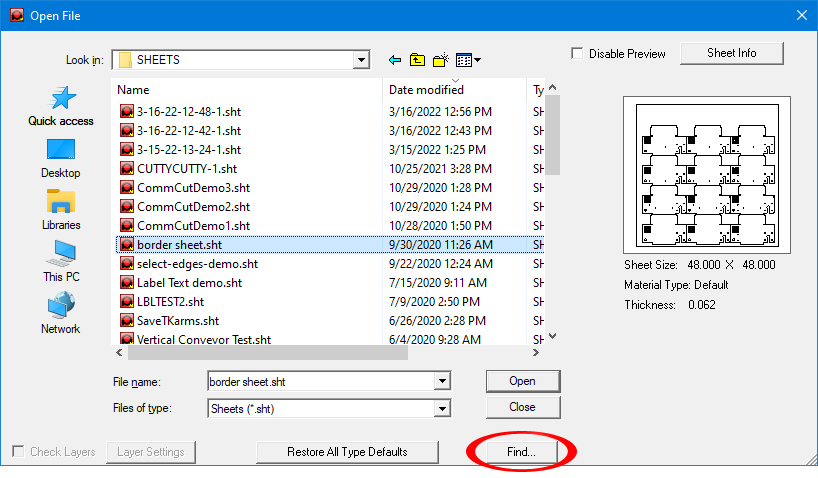
To search for a Sheet
file, click the Find button circled
here in red
when "Sheets (*sht)" is chosen
in the Files
of type field
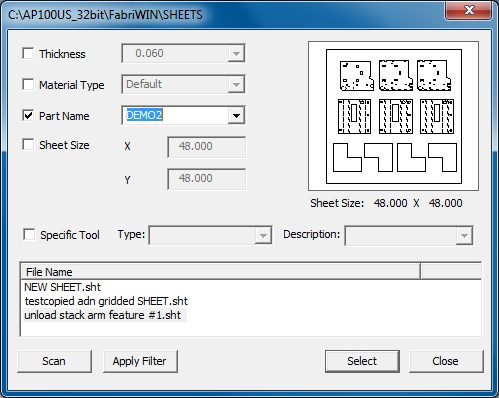
In
the Find window that displays next, the Part
Name filter has been checked to
enable the display to list only those sheets that contain the "DEMO2"
part
How the Filtering Process Works
To begin,
click ![]() to
have the program examine the characteristics of all files in the selected
folder and populate the checkbox fields. Then check the box next to the
desired filter type(s), such as Part
Name to activate that field and click the drop-down arrow to select
a specific part to become the search criterion (such as "DEMO2"
as shown above).
to
have the program examine the characteristics of all files in the selected
folder and populate the checkbox fields. Then check the box next to the
desired filter type(s), such as Part
Name to activate that field and click the drop-down arrow to select
a specific part to become the search criterion (such as "DEMO2"
as shown above).
Since only Part Name>DEMO2 was selected, the filter will look for DEMO2.PRT in all of the sheets in this folder. If that part is present in a sheet, it will display in the File Name view.
Now click
![]() to
allow the system to filter out files that do not meet the search criteria.
to
allow the system to filter out files that do not meet the search criteria.
Note: The user may check multiple filters at once.
The search results returned three sheets that contains the DEMO2 part. Select a sheet in the File Name view, click the Select button and the search window will close.
The selected sheet now appears in the File name field of the Open File window as shown here -
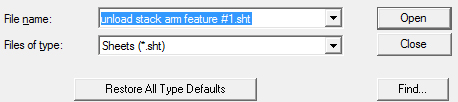
Click Open to place the sheet in the AP100US work area. The user may also use this same approach to batch select parts.
Note: Sheets that contain the selected part may contain other part files as well.
Part Filtering
This search utility also allows part filtering. To filter parts, select the Parts (*.prt) option from the Files of Type drop-down. The Part filter functions in the same manner as the Sheet filter; however, parts cannot be filtered by name and when searching by size, results will return showing all parts with the specified dimensions in addition to parts that are smaller.
After filtering, parts that appear in the File Name field can be single or batch selected and then loaded onto a sheet in the AP100US work area by pressing Select.
Note: The Part filter also functions the same when loading parts in the Sheet Wizard.
Search for Parts using a Specific Tool
To search for parts according to the part info saved with the tool, begin by selecting the Parts (*.prt) option from the Files of Type drop-down. Check the Specific Tool checkbox, specify the tool Type and Description. Hit the Apply Filter button and parts that use that tool appear in the File Name list.
Note: This option is not available for Sheet search.
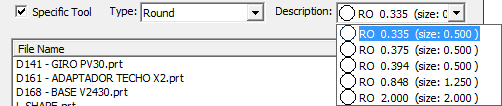
Standard and Special Tools may be searched
Restore All Type Defaults
When loading parts or sheets and accessing other directories outside of the default directory, the user may not be able to return to it. Pressing the Restore All Type Defaults button will return the user back to the default directory as it was configured during installation.
The Check Layers option in the Open File dialog box becomes available whenever the user selects *.dxf or *.dwg file types from the Files of type: list. Check this box and click the Layer Settings button and when the software starts the importation process, the Select Layers dialog appears -
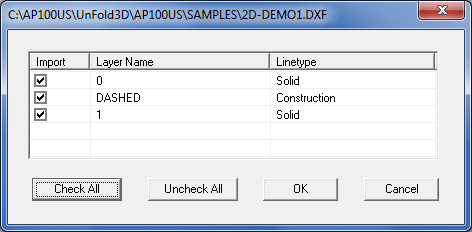
Place a check mark in the check box next to a layer name that you want to import. Remove the check mark from the check box next to a layer name that you want the system to ignore.
For example, a file may have a Pattern Layer and a Dimension Layer. To import the Pattern Layer only, place a check mark in the Pattern Layer check box and remove the check mark from the Dimension Layer check box.
In the Linetype column, toggle the choices between “solid” and “construction.”
Click OK to continue or Cancel to exit. Click Check All to place check marks in all the check boxes. Click Clear All to remove all the check marks.
To track any part(s) contained in a sheet that have been modified after the sheet was created, check the Sheet/Part Association option in the Preferences>Default Values>Sheet/Part Association window.